


The following Implant systems can be chosen:
- AstraTech Implant System EV
- XiVE
- Ankylos
Below you will find answers to a wide range of questions about the different CEREC products. If you cannot find your personal question, you have the possibility to submit your question to us via our contact form.
Within CEREC SW, Primescan models can be used for all indications supported by Omnicam. Models created and exported can be used for any CAD/CAM dental application, including dental surgery and orthodontics.
Primescan’s outstanding full-jaw accuracy offers the potential to digitize future indications that today can only be treated conventionally.
Surfaces of the following materials can be captured without coating:
• Enamel and dentin, dry, wet, and coated with blood.
• Oral soft tissue.
• Composite restorative materials.
• Ceramic restorative materials (polished, see limitations below).
• Metal such as gold, titanium and amalgam(see limitations below).
Powdering the teeth does not have a significant effect on scan performance.
Fully translucent materials, e.g. glass may require coating prior to capturing. The recommended coating agent in these cases is CEREC Optispray. A layer of minimum thickness is sufficient.
Both products feature identical hardware. Pre-installed software and licenses differ, with the CEREC SW only being installed on CEREC Primescan units.
Every Primescan AC can be upgraded to a CEREC Primescan AC.
Yes, the Connect SW 5.x is included in every acquisition unit with delivery as well as one Inbox license. This enables a smooth workflow between the dentist and his or her laboratory.
The innovative Smart Pixel Sensor processes more than 1,000,000 3D points per second, producing photorealistic and highly accurate data.
In certain aspects, Primescan was viewed as the most accurate among the tested intraoral scanners that were compared in an in-vitro study.* Its dynamic depth scan technology enables perfect sharpness and outstanding precision, even at a measuring depth up to 20 mm – an absolute advantage for deeper-lying indications.
*Ender et al, Accuracy of complete- and partial-arch impressions of actual intraoral scanning systems in-vitro, Int J Comput Dent 2019; 22(1); 11- 19; in the peer group of intraoral scanners, which did not cover several systems commercially available today, Primescan showed the best median and mean values across complete arch, anterior and posterior segments, few statistical limitations apply
Both for its touchpad and its monitor touchscreen, all Windows 10 gestures are supported.
The acquisition unit is equipped with a touch monitor that includes an on-screen keyboard, which is opened automatically when needed.
Yes, the data can be used in the inLab software.
Yes. CEREC SW 5 has the same compatibility as the previous version.
No, this is not possible.
Yes, it is possible to operate two CEREC scanners (even CEREC Primescan and CEREC Omnicam) with one milling unit, e.g., via a wireless connection.
Yes. Primescan AC can be upgraded to a chairside unit by just purchasing CEREC SW 5. As soon as you have CEREC SW 5, you can work with a CEREC milling unit and CEREC SpeedFire.
Yes, data can be exported via STL or to 3rd party CAD software at any lab using Inbox via the Connect Case Center.
If there is no CEREC SW installed, it’s not possible to design at all. If CEREC SW has been installed without licenses, it can be used in demo mode to design restorations, but these cannot be exported or manufactured.
Only with a CEREC SW license can restorations be designed and produced.
Yes, by exporting the data as an STL file, models can be printed with all common 3D printers.
Graphical User Interface (GUI)
3D Scene (View)
Design Phase
Tap and Hold: Tool wheel opens
Yes, STL export of scan data is already included in the CEREC Software, Connect Software and CEREC Ortho Software. No additional license is necessary.
All our scanners come with an Inbox license to enable a smooth workflow to all labs. Therefore, we are as open as possible. However, we also provide a large number of seamless workflows and workflows with validated partners.
The Connect Case Center Inbox is a software application that allows receiving cases through the Connect Case Center and importing them into any lab software.
Each CEREC Primescan AC and Primescan AC is delivered with a free-of-charge license voucher which you can give to a laboratory of your choice. Additional licenses can be ordered.
Customers who invested in OraCheck 2.15 and do not want to upgrade, will be supported by Cyfex. Dentsply Sirona will support Version 5 and above.
OraCheck runs on all Primescan AC, Omnicam AC and CEREC AC which are upgraded to Windows 10. In addition, OraCheck runs on all Windows 10 PCs which fulfill the following requirements:
The OraCheck application requires a valid OraCheck license. It will be installed by the license manager on the USB License Stick (Codemeter) or on the virtual Codemeter Stick.
Similar to the Connect Case Center Inbox, the virtual Codemeter Stick is installed together with the installation of the license manager.
If you install the license on the virtual stick, your PC and the license are linked irreversibly. That means that if your PC is broken, the license will be lost. Optionally, you can order a physical Codemeter Stick from your dealer.
Yes, you can run OraCheck on a Windows 10 PC which fits the necessary requirements. Furthermore, you need to have a valid OraCheck license on your PC.
Yes, OraCheck can import STL files and analyze the data. OraCheck may be a useful extension for intraoral scanners without an analysis function.
However, Dentsply Sirona does not guarantee that working with STL files is possible in every case.
It is not possible to answer this question completely. Accuracy depends on the accuracy of the acquisition system. Geometries are interpreted without any changes.
The visualisation of the analysis results is limited to 0.1 mm.
The direction in which the distance between two geometries is measured, is perpendicular to the surface.
This is why OraCheck is no reliable source for academic research but for visualization of the results. For accurate distance measurement Dentsply Sirona recommends the 2D sectional view.
OraCheck has all functions you need for patient monitoring before and after a treatment.
The license is permanent.
There is no general discount for Club-Members. The Club is a global structure, whereas OraCheck is currently limited to the USA and Europe.
You can run OraCheck SW 2.15 on your AC. If you want to upgrade to Windows 10 and OraCheck 5.0, please reach out to your local distributor for an individual offer.
Yes, OraCheck is offered as a full version. If the hardware requirements do not change, you can even skip multiple versions.
OraCheck does not connect to the Hub or to the patient data base yet, but this is a target for future versions.
When working with OraCheck for the first time, you create a new case which will be the reference scan for future comparisons.
No, the connection is established via the Acquisiton Center, AC, and the SIDEXIS software.
There are multiple workflows depending on the clinical situation. Best-case, every patient is scanned during the first appointment. This is the reference scan. To increase efficiency, a trained assistant scans the patient, starts OraCheck and registers the current scan to the previous one.
Due to better performance of the scanner, Primescan users are more likely to adapt this approach. For Omnicam users, the guided scan is recommended.
No. We stick to our seamless, validated and open philosophy, which means that a validated and seamless workflow will always create a better user experience.
Dentsply Sirona cannot gurantee a smooth workflow with all the different STL files generated. In our seamless workflow we transmit the patient information, colour and support in case of problems.
If they are imported from a Dentsply Sirona software, they are shown in colour. STL files are not coloured.
If OraCheck is not able to match the models. This means that there is too much deviation.
Please keep in mind that there are always differences between the models, even if the same model is scanned twice. This is in relation to the scan strategy, accuracy and precision of the scanner.
OraCheck supports the dentist to visualize changes and to indicate diseases. As the diagnosis is made by the dentist in every individual situation, Dentsply Sirona does not recommend any specific paramaters.
No. OraCheck visualizes the differences between scans. The diagnosis is made by the dentist.
Yes, OraCheck will run with all releases of version 5.
After installation of a newer version of Connect Software, CEREC Software or CEREC Ortho Software, you might need to reinstall OraCheck. This process will be improved.
Primescan is the best choice due to the scanning speed and performance. Omnicam should be used with guided scan.
You may use all scanners which can export STL files and do not have a patient monitoring feature to work with OraCheck.
OraCheck is a Dentsply Sirona CAD/CAM product. Please consult the usual information sources such as CEREC Doctors, the International Society of Computerized Dentistry, your dealer, or the Dentsply Sirona Customer Service.
The Pro Module includes advanced chairside applications for dental treatment. OraCheck is used for monitoring.
Yes, the CEREC Ortho SW runs on a PC. The PC must meet the necessary system requirements:
A USB license drive is also required.
Yes, but with restrictions: Omnicam scans can only be loaded into the CEREC Ortho SW if they have been acquired by using Guided Scanning. Primescan does not have this limitation.
In addition, the scans must be exported as DXD files (RST cannot be loaded) or, in the case of Primescan, synchronized with Hub.
Although this is not required, we recommend to follow the scan protocol for Omnicam described in the manual.
No, Omnicam remains validated even after the Windows 10 update.
Though the SureSmile software is cloud-based and available in many regions, the availability of physical products differs.
Yes, this is possible. Using the software applications SureSmile Ortho and SureSmile Advanced and a digital model provided by SureSmile's Digital Lab, practitioners can make their own treatment plans and manufacture aligners in their own laboratory.
But further workflows are possible: For example, case planning by SureSmile and manual production in one's own practice. Or the delivery of the printed models and only the thermoforming in the doctor's own lab.
Dentsply Sirona recommends starting with a few full-service cases to get used to the software.
In order to connect to other devices, Hub needs to be connected to a network. This means all devices need to be connected via a router. A direct connection between CEREC AC and Hub will not work, as this kind of so-called “peer-to-peer” connection does not constitute a network without expert configuration.
A connection via a switch (without router) is possible but requires manual assignment of IP addresses (no plug and play feature).
Plug and play functionality requires that automatic IP address assignment (DHCP) is active in the network. For networks with manual address assignment, the User Manual provides a step-by-step guide for installation.
Sidexis (version 4.1.3 or later) connects with Hub automatically in the background. Now Sidexis can be selected as storage location in the settings of CEREC or CEREC Premium software. From now on your acquisition unit will automatically access the Sidexis patient database.
Not currently.
Currently not.
Hub has a documented interface (API) that allows connection to third-party-software. This means that Hub is prepared for this and a connection can be established as soon as the manufacturers of practice management software implement the functionality in their software. We are currently in contact with major software manufacturers in order to announce possible connections soon.
Hub will save all CAD/CAM data in a so called RAID-system. This means that all data is saved twice on two different hard disk drives. The data is transmitted with heavy encryption directly out of the CEREC or CEREC Premium software and stored securely on Hub.
Hub enables the encrypted transfer and storage directly out of the software, and is not susceptible to unauthorized access by malware, viruses or the like. In addition, only Hub features an Action Items list that provides an overview of unfinished cases.
Hub connects to all compatible devices within the network. It is technically possible to connect several locations if a consistent virtual private network (VPN) connection is established between practices. However, such a solution is complex and often not practicable due to undependable transmission speed between practices.
Hub is optimized for use in private dental practice. Hospitals and universities usually have complex networks and server architectures that suppress or block services that are required for the plug and play functionality of Hub. In individual cases, setup must be clarified with the responsible IT representatives.
Currently only via a virtual private network (VPN), which makes your home computer appear to be part of the practice network. This requires advanced networking knowledge to set up.
Yes. Hub's hardware is designed to run non-stop. Therefore, Hub should be connected to a power supply circuit that is not switched off at night.

Only Implant sizes, of which a sleeve of the guided system is available, can be chosen. This is indicated by the sleeve symbols.

For choosing AstraTech Implant System EV, select AstraTech EV Guided Surgery in the 'Current plan's properties' menu.
For XiVE and Ankylos, select DENTSPLY Friadent ExpertEase.

No, the D1/D2 value is fixed and cannot be changed for guide sleeve of CEREC Guide 3.

Yes. The implant planning is done with guided sleeve system. Please make sure that a minimum distance of 0,5 mm is given between the outer sleeve and the neighboring teeth to ennsure stable sleeve support for CEREC Guide 3.
No, the export option is not available yet.
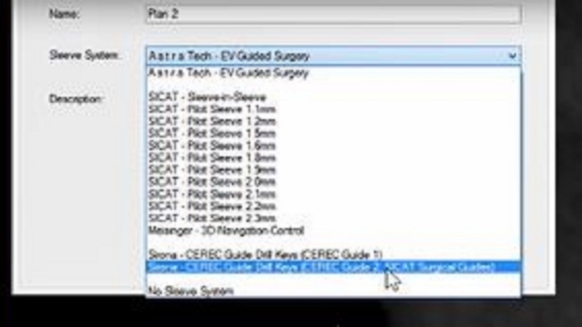
The sleeve must be changed to CEREC Guide Drill Keys (CEREC Guide 2) in order to activate export.

Then, change D1 value to an arbitrary number (e.g. 0,1 mm) to enable export options.
Please note: This is only a workaround and will be disregarded by the CEREC Software for CEREC Guide 3.
Import planning data (CMG.DXD) into CEREC 4.6.1. to design CEREC Guide 3 (drag & drop).

CEREC Guide 3 is automatically detected and sleeve is shown with guide support. Minimum material of 0,5 mm must be given for sleeve support. Otherwise, a user notification is shown and user must update implant planning and must import planning results again.

Our customer service center will be pleased to assist you. In order to do so, please fill in our contact form.